How To Achieve Perfection When Creating The Ghost Mannequin Effect (Production & Post-Production)
Introduction
The ‘Ghost Mannequin’ effect also known by its various other names such as “hollow man” or “3D mannequin” is an easy yet dynamic post-production technique. It is used by apparel and fashion photographers to enable them to showcase their products with ease.
This effect is put to use by taking multiple photos of a garment on a mannequin or model, and then combining the final images to remove the mannequin or model during the post-production process.
The resulting image is of a lifelike “ghost” wearing the product. This ensures that the customer’s focus does not waiver from the product.
There are options of “invisible” or “see-through” mannequins available to use in order to photograph fashion accessories and apparel. Mannequins enable the items to maintain their shape that makes the image look more spick and span. Invisible mannequin is often combined with (simultaneous) processes such as De-creasing, Reshaping, Cleaning, Recoloring, etc.
Before we can get into how to use this technique for post-production, one needs to coordinate with the photographers during the time of production itself to discuss the minutest of details and ensure accuracy. So, let’s go through the basics to be kept in mind during the production process.
Production
The first and most important rule to remember when you are creating a space for ghost mannequin photography is that the “composite image” is going to be an accumulation of two or more images being stitched together.
For this purpose it is crucial that you get all the images the post-production team will require. Which basically means you need to get the insides of the garment photographed as well so that when it is being constructed, it doesn’t look incomplete.
Most invisible mannequin images are made up of two images at the most, but sometimes it’s necessary to use more and create a single image of the garment. To understand this technique better, take a look below at some of the invisible mannequin product images.
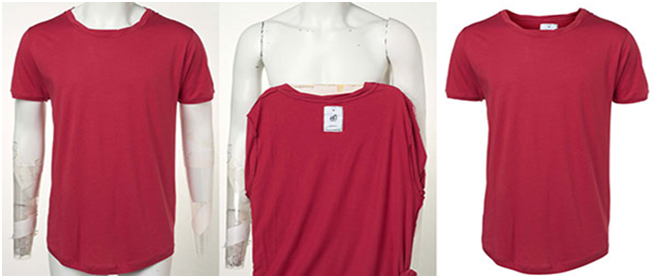
Garment on mannequin Expose covered area Joined previous 2 images
In order to create the invisible mannequin illusion, choose the right kind of mannequin that accurately fits the shape and size of your garments. To have a better understanding of the ghost mannequin concept look at the product images below to observe what actually goes into execution of this technique. Essentially how products are placed on the foam board to provide even exposure of the product to the camera.
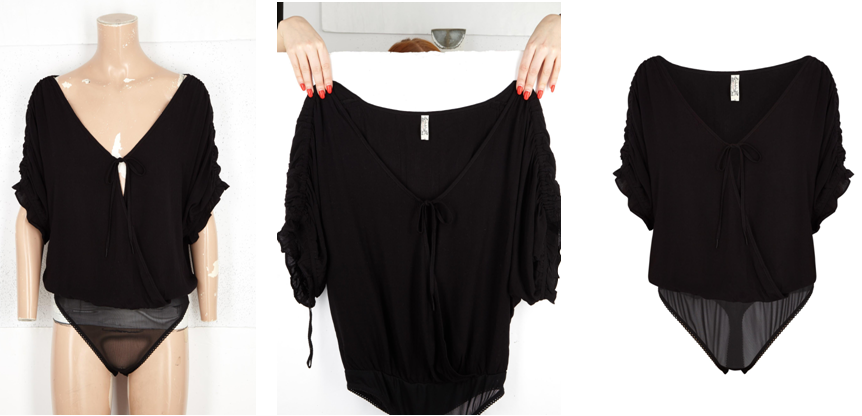
Garment on mannequin Expose covered area Joined previous 2 images
After looking at the pictures above I hope at this point you might have got a better understanding of the invisible mannequin technique and the kind of shots required to be photographed.
Further let’s go through the process as to how photographers should set up the studio and photograph accurate images of the garment on mannequin, so that it meets the editing requirements.
Photographing the garment on mannequin
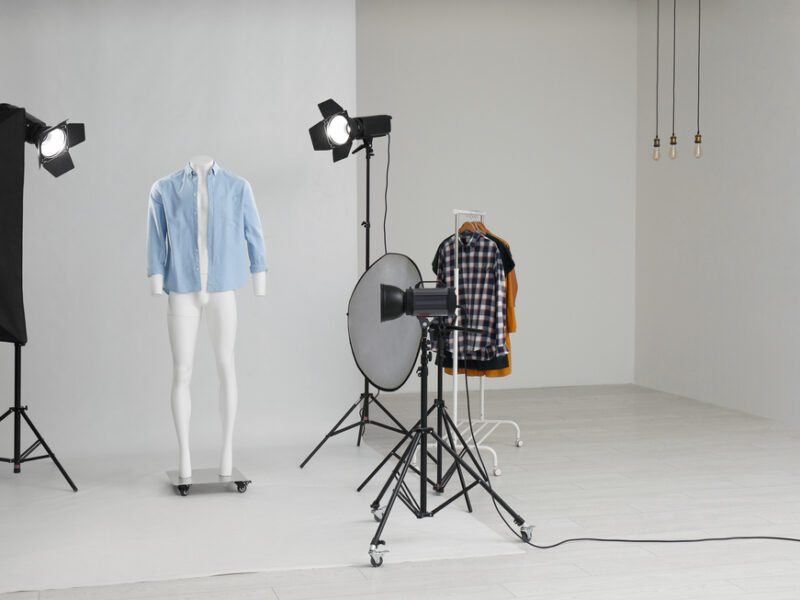
In order to capture good quality images, one has to have everything perfectly in place in a studio setting. From choosing the right kind of mannequin to perfect studio lighting and other equipment, come into play when you are shooting.
Moreover, using the right kind of camera lense can make all the difference.
Using a telephoto zoom lens to minimize the distortion while photographing the product will enable you to move closer to smaller objects and move farther away from large objects.
To create an invisible mannequin effect, you need to capture the front part of the garment on the mannequin and the neck/inside part which has the brand’s label by clipping it on a white foam board.
If further you want to showcase the product in 3D, photograph the garment from the back side as well. The necessary internal shots will differ for every product.
While shifting your product from the mannequin to the foam board, remember the lighting condition of the studio should remain consistent.
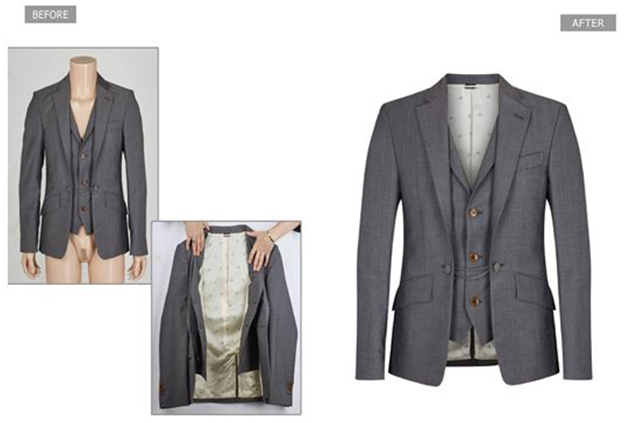
The shots that you have taken for various garments are further processed in the post-production step to give the garment a complete look or simply to give it the ‘ghost mannequin effect’.
Post-Production
Although creating the ghost mannequin effect is relatively simple, outsourcing the work to an image editing company can save you a significant amount of time, money and frustration that comes along during the post-production process.
We at EIE are masters of providing the best ghost mannequin services.
Take a look below at the perfection with which our editors at EIE execute the ghost mannequin effect in Photoshop.
- Open files in Photoshop and create layers
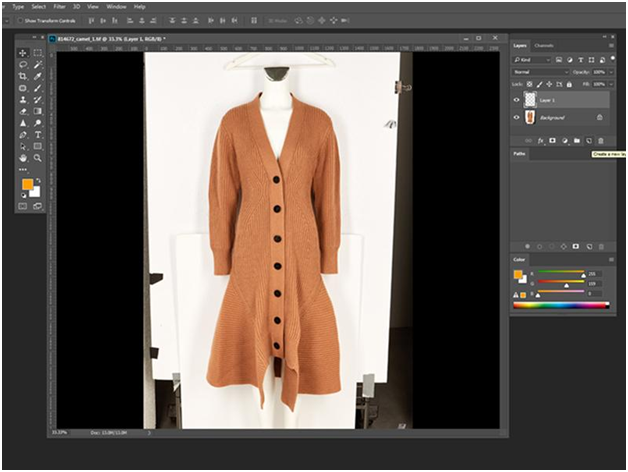
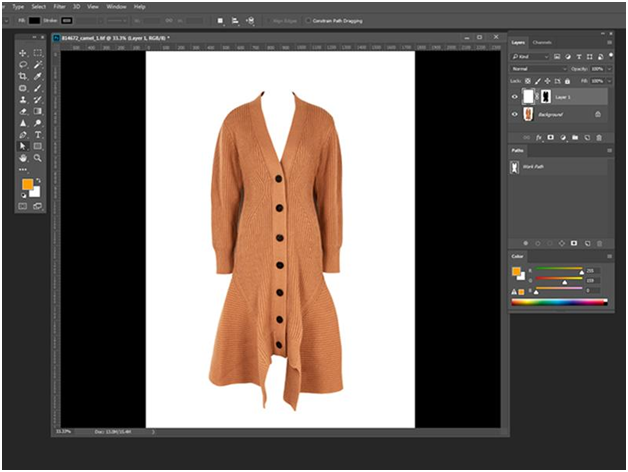
First of all one needs to open the mannequin image in Photoshop. After that select the mannequin image and create a new background layer. Then, fill in the new Background layer with white, because that’s going to serve as the overall background layer when the editor will finish editing.
2. Use a selection tool to select the product in the mannequin image
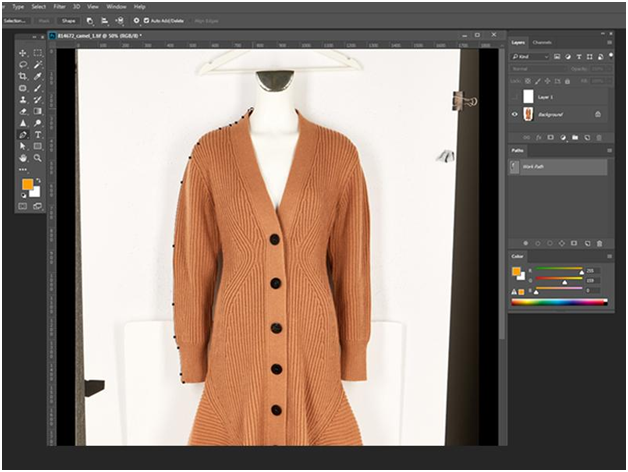
Shooting your products always in front of the white backgrounds, helps an editor to remove the mannequin easily because of color separation between the background and the product.
Now, choose your favourite ‘Selection tool’ :-quick selection, lasso, or magic wand. All the three tools are effective to achieve the desired selection.
As you can see from the image above on choosing the selection tool the ‘marching ants’ (dots) would appear around the product.
3. Apply layer mask
On selecting the entire product, refine the mask so that it is compact. This will aid in eliminating all of the background and mannequin and can be accomplished by utilizing the Refine Edge tool in the Select menu. Click OK in the Refine Edge dialogue box and place a mask on the cardigan.
At this point, one can see the product floating freely on the white background that was created in the beginning. If necessary, refine the mask slightly more or potentially refine the product’s edges again to give it a clear and clean appearance.
4. Repeat previous steps with the foam board image
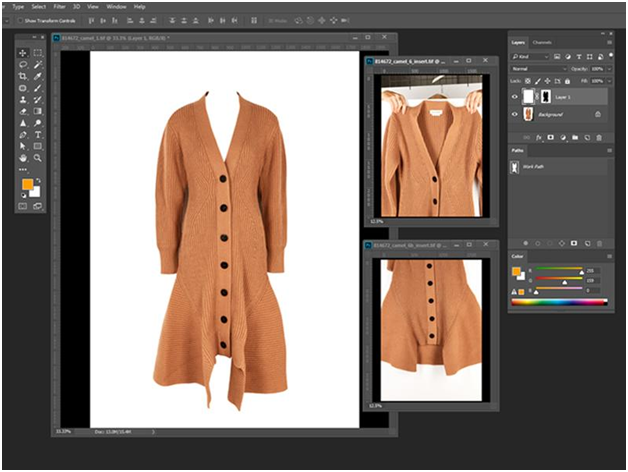
After masking the front part of the product on a layer, open the foam board product image in Photoshop. Steps One, two and three are repeated on the foam board image.
Create a new layer, select out the product, and create and refine your mask.
Now your foam board mask is placed on Layer 2.
5. Amalgamate the images
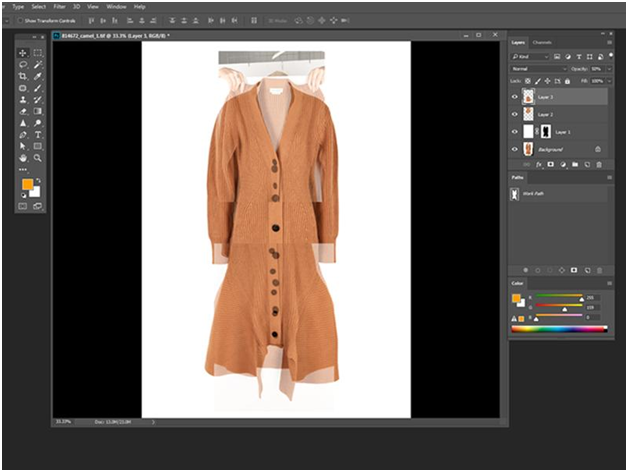
The layer labeled as ‘1’ contains the clear mask of the product from the front side and the layer labeled ‘2’ contains the mask of the inner part, also called the ‘inserts’. Now drag the mask from the foam board image over to the image of invisible mannequin product image. Adjust the proportions of the foam board image below the mannequin layer that it fits perfectly behind.
6. Add shadows and save the final output
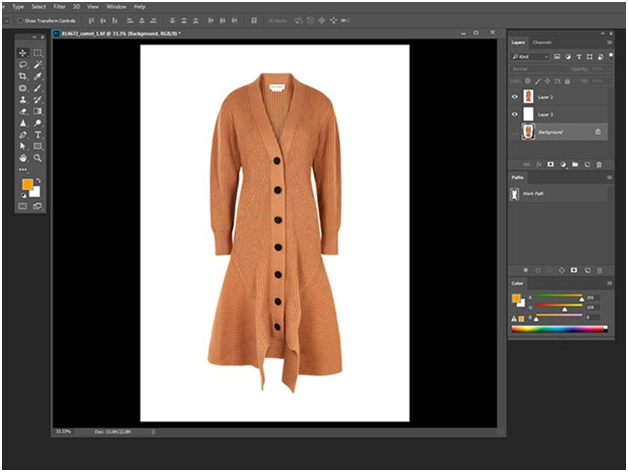
After the editor finishes joining the inserts with the mannequin product image they obtain a full and complete image as one can see from the image above.
Finally to give the product some depth, add a shadow between the two layers, to give the image a professional and realistic appearance.
And that’s it! The Ghost Mannequin Effect is deployed on mannequin images.
Fuse EIE into your Work Process
If you want to be efficient and accelerate work at scale, fast, cost-efficiently and obtain high- quality visual content, you can rely on Ecommerce Image Editing wholly.
We have been providing professional ghost mannequin services to several world-known media, fashion, printing, e-commerce, photographers, photo studios and different artistic agencies for more almost two decades. Being the unbeatable ghost mannequin services provider all over the world, we can reveal the secret.
Ghost mannequin effect is cost-efficient for e-commerce fashion garments and an effective way to engage customers with products. Collaborating with EIE for post-production services gives your business an edge to excel, resulting in higher sales for online e-commerce retailers and cataloguers.